

There is a common question which is asked from some people & who are willing to know about How to create a WordPress Site Database Back up or Full Site Back Up. So, all those who don’t know that “How to keep and/or create WordPress Site Database Back-Up” may check this out…
Well, after so long (being busy in my other client’s projects: Kidstalentz.com & Yogasecrets.org) I have been able to devote some time back here and surely after Diwali I’ll be able to maintain regularly. So let’s come back again on our Topic and See:
Different Ways for Keeping WordPress Database Back-Up
Creating Whole WordPress Database Back-Up (Includes Settings via Cpanel)
Creating WordPress Database Back-Up (Only of Content via WordPress Blog)
Creating WordPress Database Back-Up (Using WP Back-Up Plugins)
Complete Back-up of All Websites and Database at Once (Using Cpanel Services)
Note: This tutorial is for those who has their Hosting Control Panel of the Site and complete access of it. As mentioned above in the Headline that 3 ways will be discussed from which 1 option allows you to take WordPress Site Database Back-up without Cpanel Hosting and/or without the access of their Server (limited to Add or Install a New WordPress Plugin).
Let’s Start with All the Procedures One By One:
Creating Whole WordPress Database Back-Up (Includes Settings via Cpanel)
1. Go to your site’s Control Panel
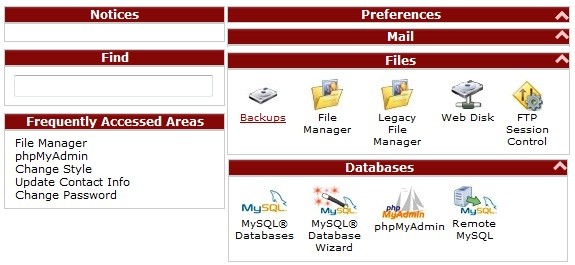
2. Choose the option Back-Ups under Files
3. After that as you can see in the image on the left side “Download a MySql Database Backup” click on the database which you need to get backed up. eg. click on username_wrpd1 for the site hosted with database username_wrpd1

>> After this a Pop-up window will appear asking you the exact location where to save the database file (file will be saved in .gz format – extract using .zip file opener)
Creating WordPress Database Back-Up (Only of Content via WordPress Blog)
1. Go to your WordPress Dashboard
2. Go to Tools Menu on the Left Sidebar of your dashboard
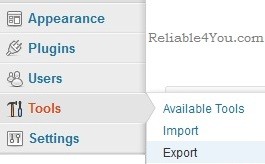
3. Click on the Export option and select the All Content or Posts or Pages as required to be backed up.
>> Use the import procedure for restoring the Database Back-up (This back up will not override the previous things but will only add the new Topics, comparing the Title of your Posts or Pages). Thus, this kind of back up can be used for integrating with other sites also.
Creating WordPress Database Back-Up (Using WP Back-Up Plugins)
There are many WordPress Plugins which can be used for taking easy back ups. These plugins are installed easily as normal and are executed to create a WordPress Database or Full Site Back-Up.

Out of many choices you can try out BackWPup Free – WordPress Backup Plugin as this plugin allows you to set the order and destination of the Back Up Files. Moreover, this Plugin allows you to take back-ups directly on your system without using Cpanel.
For further Information you can see: How To Install A WordPress Plugin.
Complete Back-up of All Websites and Database at Once (Using Cpanel Services)
1. Go to your site’s Control Panel
2. Choose the option Back-Ups under Files

3. Click on Download or Generate a Full Website Back-Up
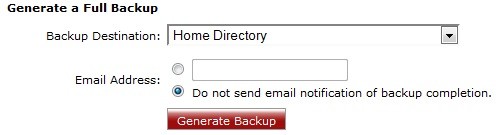
>> Click on Generate Back Up, you can also provide and email address which will inform via mail when back-up is ready. (back up file is stored under Root/ Home Directory)
Benefits:
Just with the proceedings according to these few simple steps you can keep your Data Safe and whenever you need to format you can restore your site from the Last Back Up.
Best to do before you make changes in your WordPress Site either by Installing a New Plugin or Theme, or by Deleting some Data from your WordPress Site.
It can also be used for Creating Multiple Sites with the Same Data in all or sharing some common data in all. These methods helps you with not copying manually every post or page but installing the common database (export file) with all and then organize if needed.
Limits:
In some places you would need to upgrade options or else they are by default up to 50 mb size (more than enough for a normal good running Blog)
You need to change database name and Tables name if required. (requires when installing at Some-other Host)
If some extra tables are generated before Back-Up, they will be carried along with it every-time (acquires space but doesn’t harms until the same table is required, but can be Removed Manually)
Comments are closed.